Advanced camera workshop 1
In this blog post I will be talking about the advanced camera workshop we had with Matt.
This workshop is meant to give me a deeper understanding of other settings that the camera has
We used a Black Magic 4k mini Ursa.
To set up a tripod the spirit level has to be levelled this ensures that while shooting the camera completely levelled. This is done by positioning the bubble directly in the middle of the circle.
The tripod must be locked by the two locks on the side to keep the camera in place. The ‘tilt lock’ holds the camera in the tilt position and the ‘pan lock’ stops the camera from moving left or right
White balance is used to make sure that the colours we see in real life are also portrayed on screen. This makes what we’re shooting more realistic and the camera gives you the option to change the white balance to suit what you're shooting.Exposure is the amount of light that goes into the camera’s lens, the brightness or the darkness of the video. Exposure helps us decide what kind of setting you’d like while filming.
We also shoot at 25 fps in the UK.
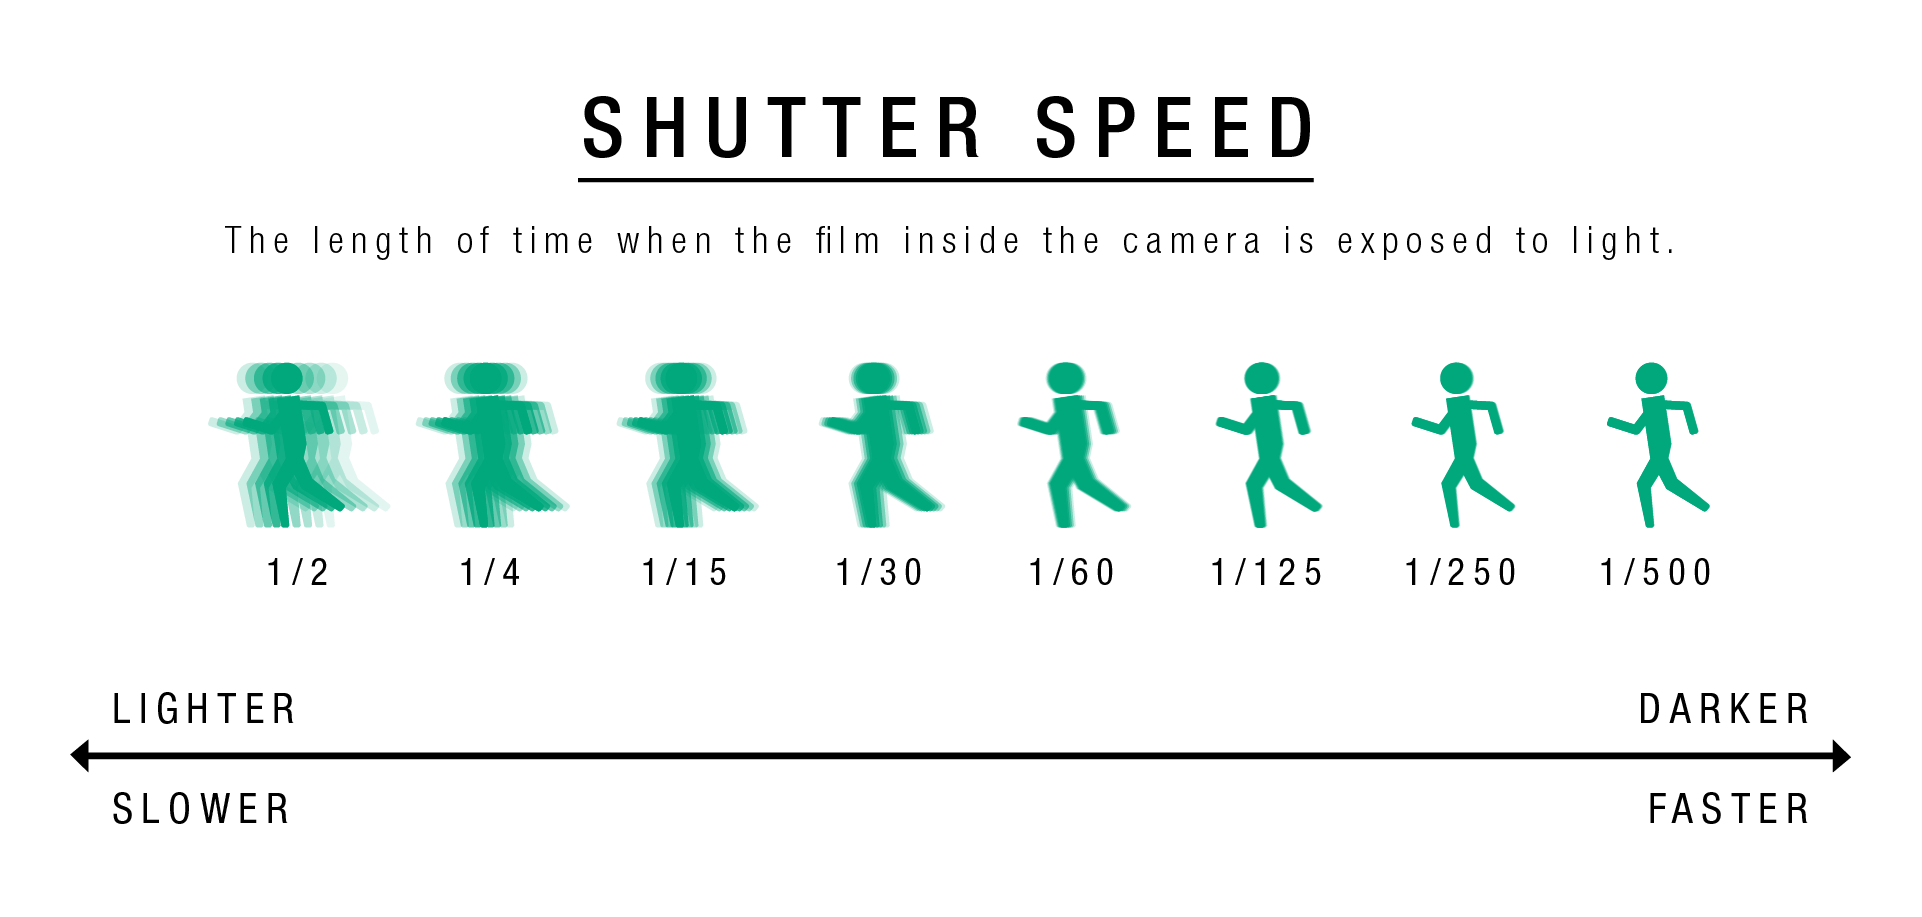
Shutter speed is the speed at which the shutter of the camera closes. The shutter speed we use is 180 and this has the same motion blur as real life movements. We change the shutter speed when we want to achieve a different effect with movement. The smaller the shutter speed the sharper the movement looks and the higher the shutter speed the blurrier it will look. For example using a 360 shutter makes the movement more blurry and this is used in a dreamy sequence or in a romantic setting to make things a little bit warmer. While a 90 shutter would make everything sharp and this would be used in a performance like sports or playing the guitar to ensure it’s in good quality.
Some of the rules Matt talked about were:
‘Light for what the camera sees and not what you’re seeing’
This means that we should concentrate on the lighting on the screen as this is what it’s going to look like in the final outcome and not what we actually see in real life.
‘Use the TV for framing only, otherwise always look through the lens.’
We use the TV to frame the subjects and place objects around otherwise we should always look at what the camera screen is displaying.
‘The importance of both composition and actor positioning.’
Composition and actor positioning are important as if one or the other looks off on camera then the whole shot wouldn’t be able to work well meaning that they both need to be accurate in order for the shot to work.
Prime Lens
The difference between zoom and prime lens is their focal length. A prime lens will have a focal length that ranges from 12 mm and 5200 mm while zoom lenses will have the zoom rings that allow you to change the focal length.
We use a prime lens as it provides a higher quality and the shallow focus provided creates a cinematic effect. To focus on a prime lens we take a tape measure and place it on the focal plane mark then move to where the subject is and the number that reads on the tape measure is the number you adjust on the focus ring.
An 18mm is used to establish the setting or introduce it, a 25 mm is used in wide angle shots, 50 mm is used for low lighting and 85 mm is used for close ups and shots of people’s faces.
 |
| The monitor we use to see what the product will look like |